There are huge upsides to decentralized gaming.
While not everybody may care if their game server is decentralized (most people won't), what people will care about is that their hard-earned achievements are safe.
Whether it's Runescape XP, a really good chess match of yours, or being the top scorer on a pinball machine at your bar, you would not be happy about somebody wiping out that reputational artifact without your control.
It's well worth exploring how we can reliably preserve our accomplishments and milestones in online gaming. In this article, we will do so with Ethereum and the Graph Protocol.
What We Will Be Building
We will be using Remix to deploy a super simple dice game smart contact to the Goerli testnet.
From here, we will hook up a NextJS frontend, web3-enabled with ConnectKit and wagmi to interact with our contract.
Finally, we will create and deploy a decentralized subgraph with Graph Protocol to index our smart contract activity and allow us to easily query game history and player stats.
The final product is live here, and the source code can be found here. I also walk through the process in the below video:
Setting Up Your Development Environment
Prerequisites
You will need to have a few things set up to follow along:
browser wallet (use a different set of keys for development!)
node and npm installed
graph-cli installed globally
Deploy Smart Contract on Remix
First thing's first, open up a starter template on Remix.
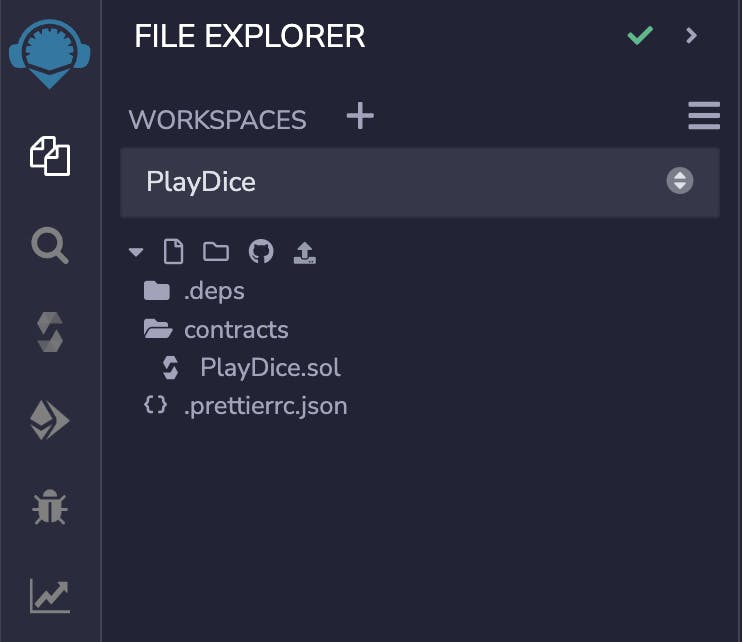
We won't need any files other than our smart contract file, so I would create an empty PlayDice.sol file, and clean up the directory until it looks like the below.
Paste in the below code for PlayDice.sol (also can be found in the repo.)
// SPDX-License-Identifier: GPL-3.0
import "hardhat/console.sol";
pragma solidity >=0.8.2 <0.9.0;

contract PlayDice {
    // stored vars
    uint randSeed = 0;

    // event definition
    event Game(address win, address loss);

    function playDice(address player2) public {
        uint result = randomOutome();
        address win;
        address loss;
        if (result == 0){
            win = msg.sender;
            loss = player2;
        }
        else { // result == 1
            win = player2;
            loss = msg.sender;
        }
        emit Game(win, loss);
    }

    // returns 0 or 1, and generates new seed
    function randomOutome() private returns (uint){
        randSeed = uint(keccak256(abi.encodePacked (msg.sender, block.timestamp, randSeed)));
        return randSeed%2;
    }
}
Writing Solidity won't be the main focus of this article, and as you might see, the contract is kept super simple - a more realistic game experience would require much more UI and Solidity complexity, which is out of scope for this article.
The important things to note here are:
The contract has a public function
playDicewhich accepts an opponent's address, simulates gameplay, and decides who wins.The smart contract chooses a pseudorandom winner with a private
randomOutcomefunction. For a properly random result, we could use a tool like Chainlink VRF, but true randomness is not critical at this stage.The contract emits a
Gameevent with the winner and loser each time a game is played (will be important for our use case!)
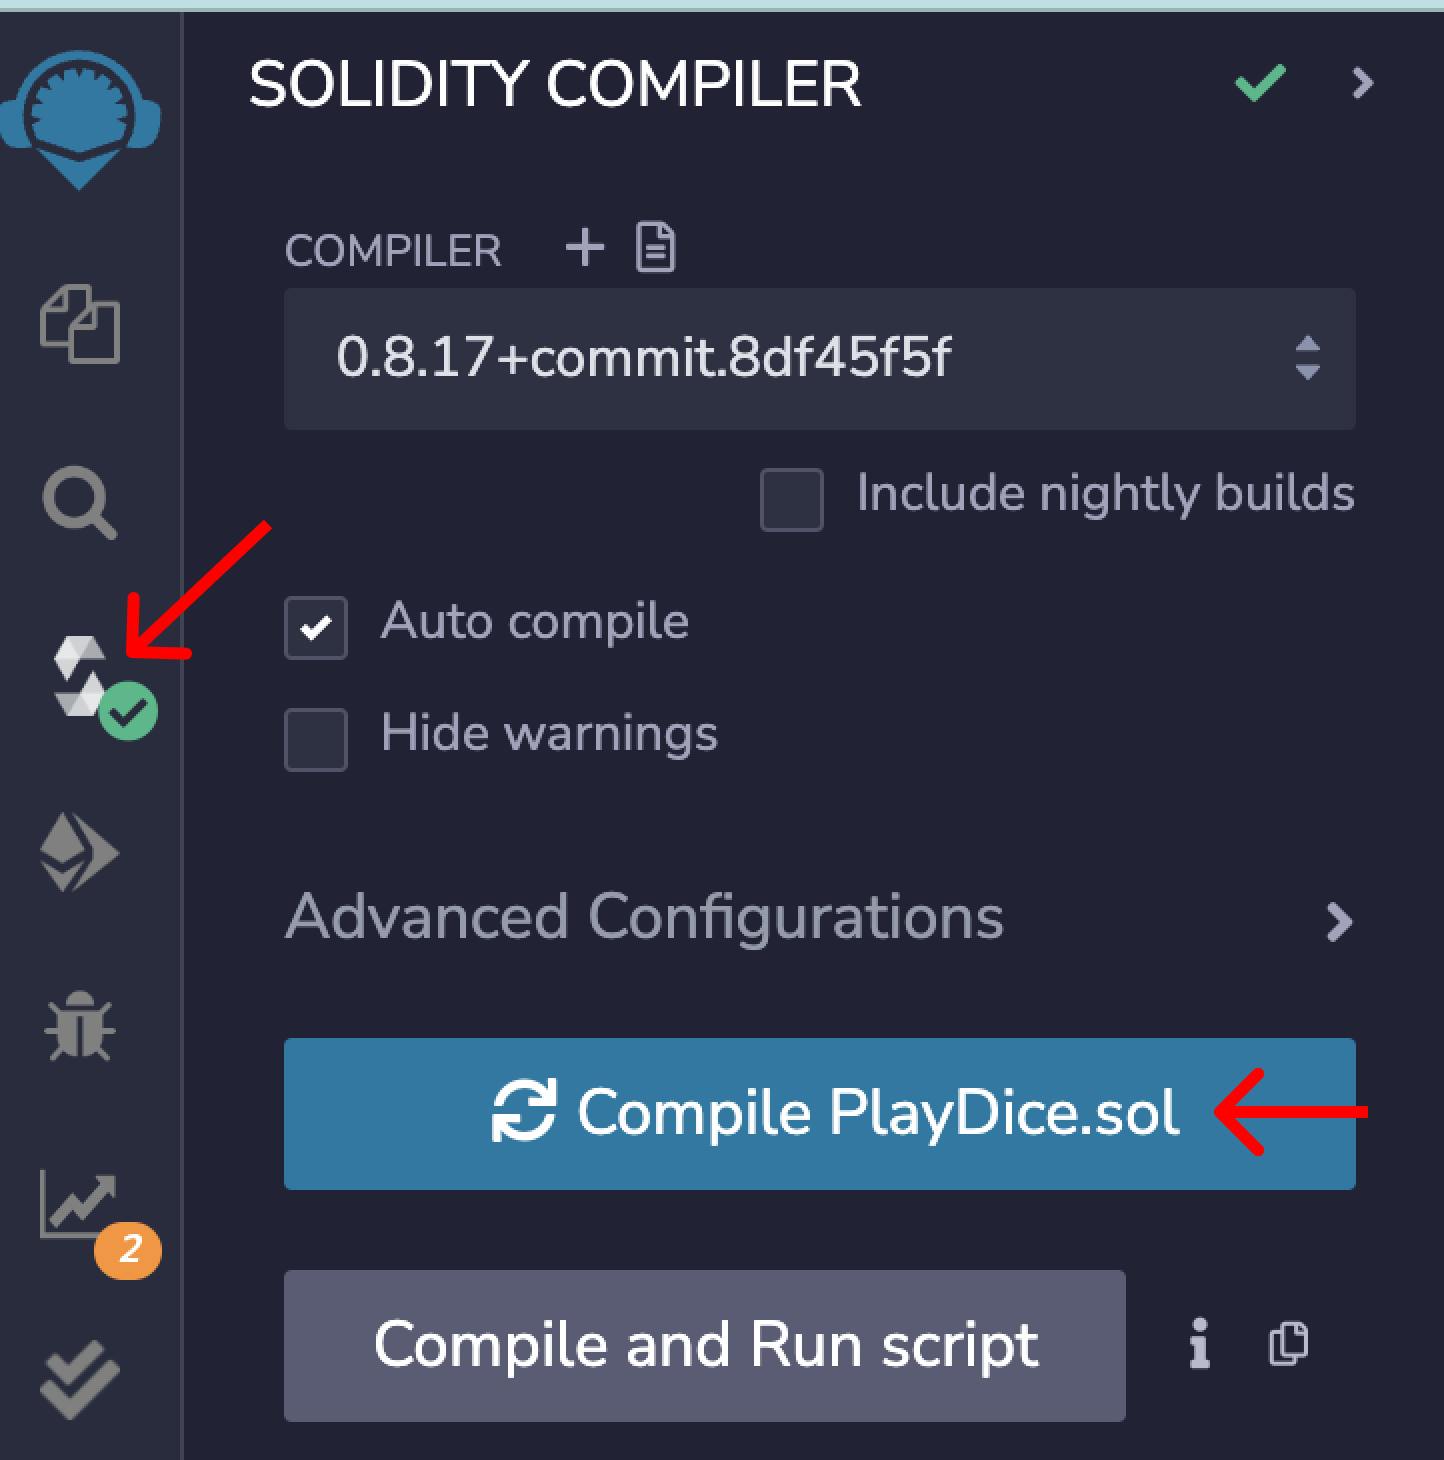
To get the contract deployed, first hit Compile PlayDice.sol on the compile screen. Note that this screen also lets you copy the smart contract ABI (we will need this later!).
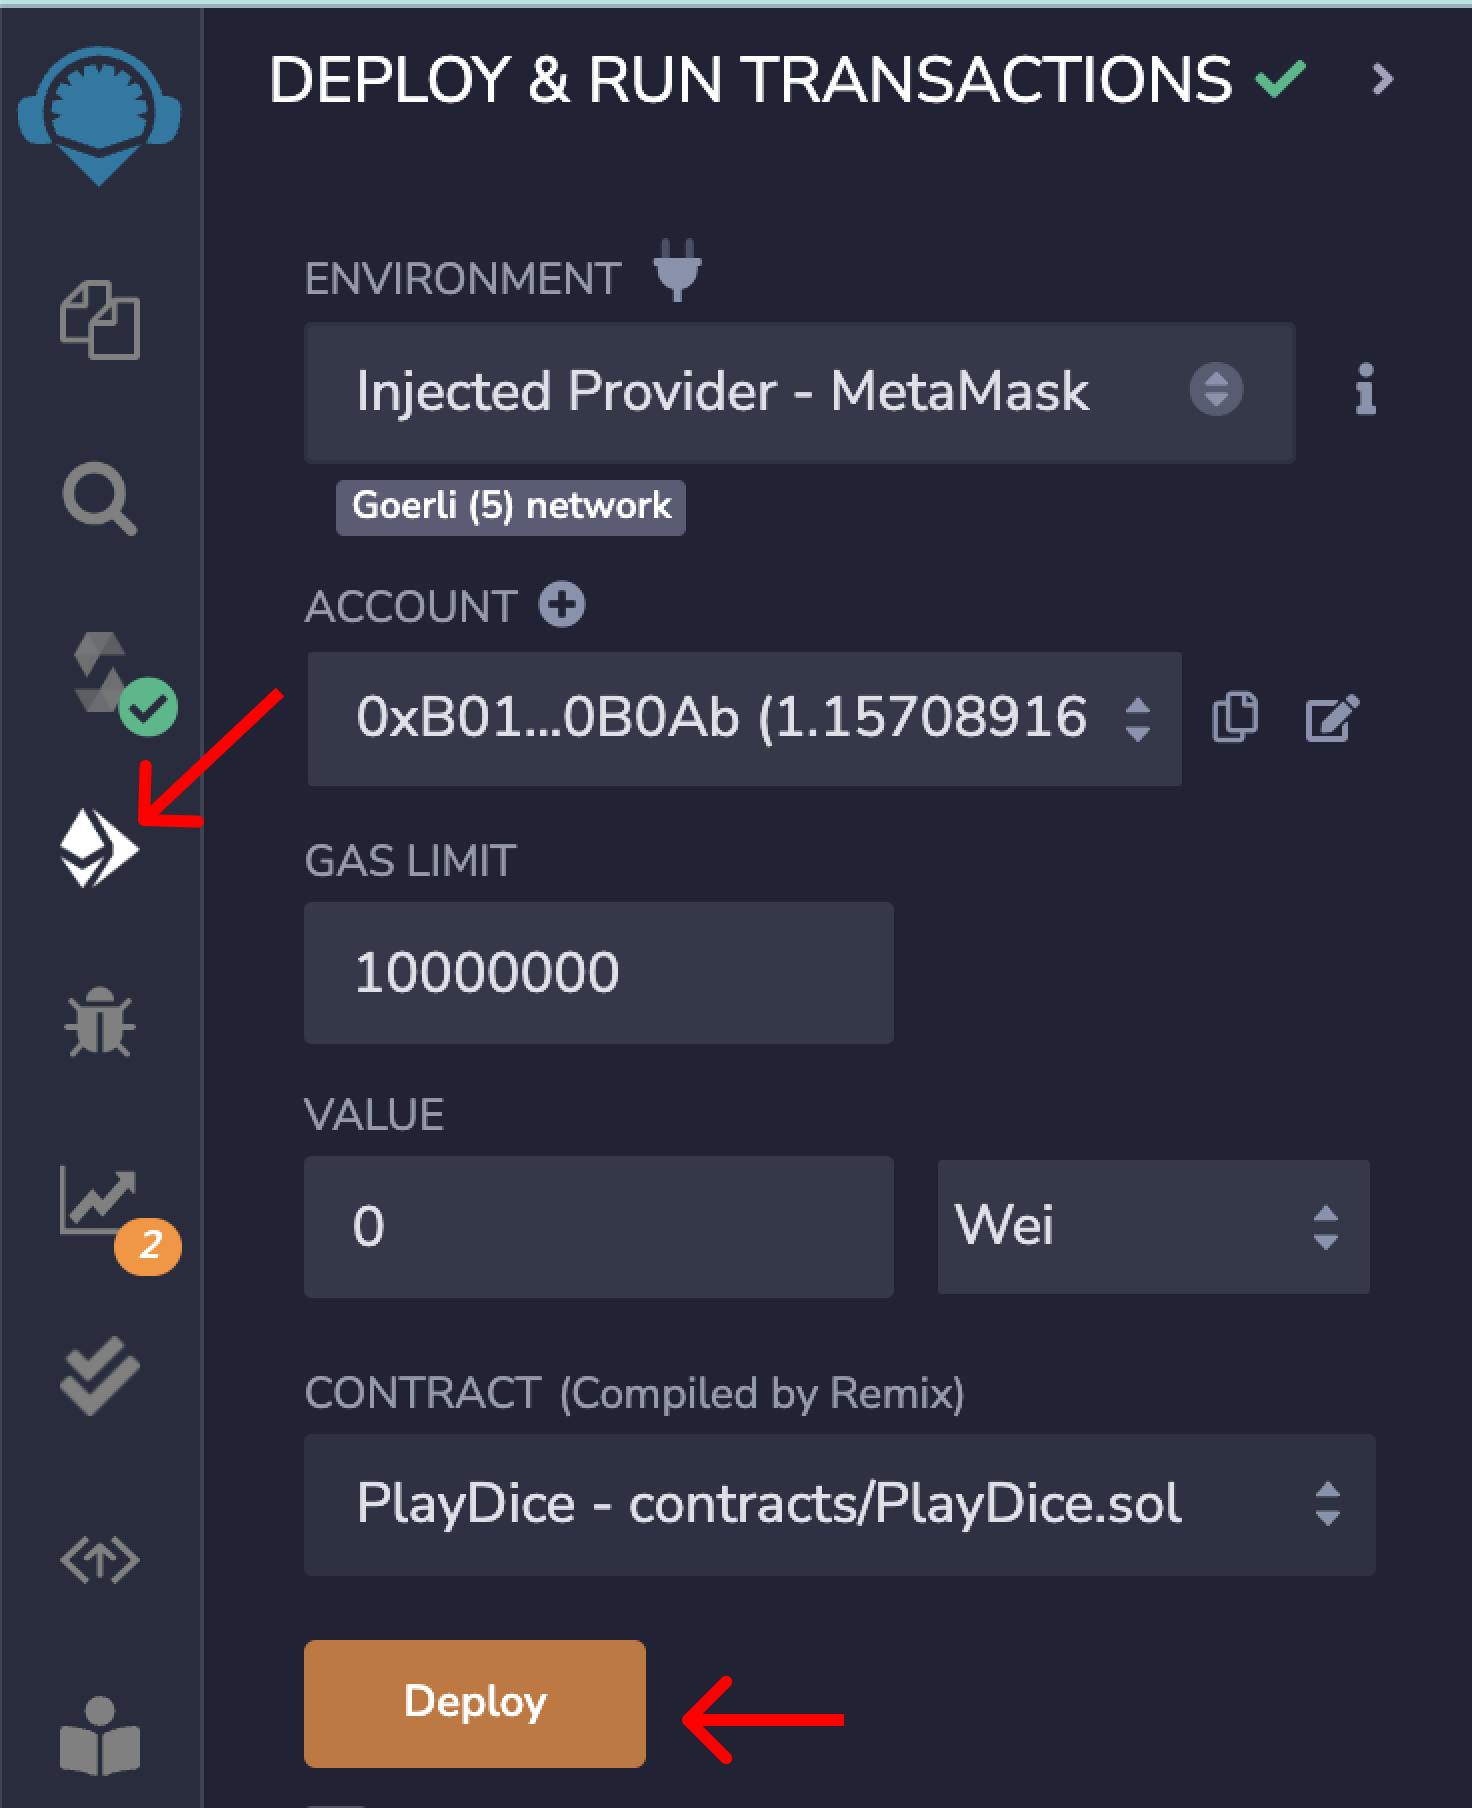
Next, head to the deploy screen. We'll do a few things here:
Change the environment from Remix VM to Injected Provider (you will need to connect your wallet)
Change the gas limit from 3,000,000 -> 10,000,000 (to avoid hitting gas limit issues)
Make sure your wallet is loaded with some Goerli eth - you can get some here
Connect your wallet, switch it to the Goerli network, hit
Deploy, and approve the transaction.
You should see your contract address pop up in the Deployed Contracts section. Copy this and keep it handy for the next section.
Check the address and verify the deployment completed on etherscan.
Set Up the Frontend
The next step is to clone the UI source code (click Use This Template).
Once you have the code open in an IDE, run git checkout start-here, and follow the README.md to get the project up and running.
Make sure to create a .env.local file and paste your new smart contract address. Don't worry about the other environment variables for now.
Once the project is up and running on localhost:3000, you should be able to connect your wallet and play a game:

If you open up the browser console, you should see logs of the frontend picking up Game events emitted from your smart contract.
Frontend Code Overview
the majority of the app can be found in
pages/index.tsx(there are some additional components insrc/componentswhich we will use later in the article)the contract events are listened to with wagmi's
useContractEventhook, given our smart contract address and ABI (more on that in the next section!)smart contract interactions are facilitated with wagmi's
useContracthook
Getting Started with Graph Protocol
Why Use The Graph
So now we have a contract that facilitates gameplay, and a UI to track and display results.
However, our contract does not store games or players over time (we would not want it to). We can't see who recently played, who has won the most games, or anything interesting other than our game outcome!
We can display smart contract events as they come in, but we have to store the events in a database to display anything long-lived, and use an API to access the data.
This is where the Graph Protocol comes in! While we could set up an event listener to catch each event and write it down in a personal database, Graph provides us a completely decentralized solution to do all of this, and even gives us a versioned GraphQL API in a few keystrokes!
Register Project in Subgraph Studio
The Graph Protocol makes it very easy to start indexing your smart contract activity. To get started, head to Subgraph Studio, connect your wallet, and hit 'Create Subgraph'. Give it a name, and select the Goerli network.
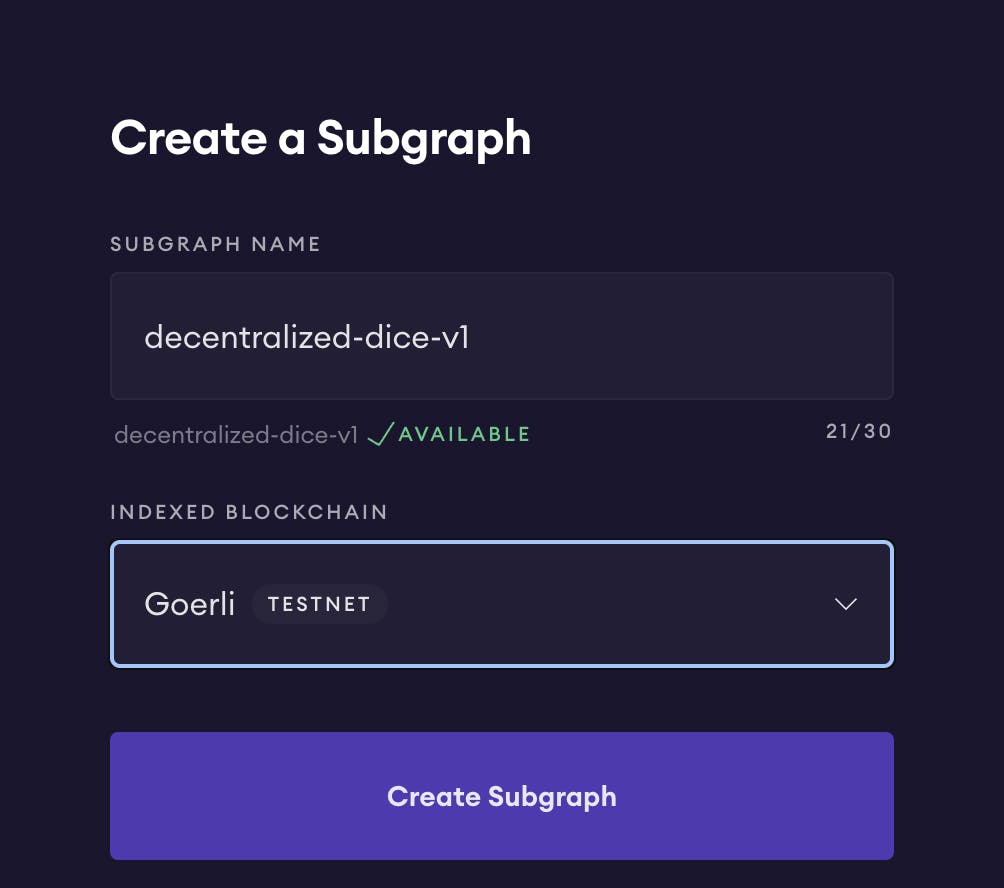
The Subgraph Studio will be your portal for checking on indexing activity, managing subgraph versions, and deploying to production.
They also provide us with a few graph-cli commands which we will use in a bit.
Define Subgraph Schema and Behavior
To plug into the Graph Protocol's powerful indexing infrastructure, we just have to specify the contract information, data schema, and desired indexing behavior.
This is done with 4 files (you can find them in the subgraph folder in the source code):
subgraph.yaml-> where we specify our contract address, block to start indexing at, and point to relevant files (schema, source code, ABIs)schema.graphql-> a definition of entities and attributes that will be queryable (in our case, if you are on thestart-herebranch, aGameentity)a JSON file with your contract ABI (copied from Remix compile screen) -> tells the indexer what functions and events the contract executes
a handler file (
sugraph/sc/play-dice.ts) -> tells the indexer how to save and modify data based on a trigger (in our case, theGameevent)
We never have to create these files from scratch. The graph init command generates all of your starting schema, YAML, and indexing logic from your contract ABI. It is then very easy to extend the files and add in additional behavior (more on that down below).
However, the init command complicates dependency management in an existing project. In the interest of simplicity, it's easier to run the init command and generate these files in a separate folder, and paste them into your existing project.
Our project already contains these files. However, I would recommend experimenting and running graph init outside the project (you'll have to copy your contract ABI from Remix) and checking out the files that get created.
The only steps we have to do here are:
update the
contractAddressinsubgraph.yamlto be your own deployed contractupdate the
startBlockinsubgraph.yamlto be the most current block in goerli (otherwise your indexer might be initiated thousands of blocks behind, and will take too long to catch up!)
Deploy Your First Subgraph!
Now that we have an idea of what files we need and how they are defined, we can deploy our subgraph!
Out of the box, the generated files define a Game entity, and save a new Game each time the smart contract emits the event (every time a game is played).
To deploy, run the following (commands can also be found in subgraph studio):
cd subgraphto navigate to deploy rootgraph auth <your deploy key>(copy the key from subgraph studio)graph codegen-> this generates some AssemblyScript types for your schema and ABI to be used by the indexer. You should never have to modify these.graph build-> builds the WebAssembly files for your indexer.graph deploy <your project>-> deploys your build!
Once your deploy command has successfully run, you should receive an API URL from which you can query your Game entity. Congrats, you deployed your subgraph!
To test it out, open up the link returned from the deploy command, paste the below GraphQL, and hit the run button.
query {
    games (first: 100) {
        id
        win
        loss
        blockTimestamp
        blockNumber
    }
}
You should receive an output like below (we have not played any games yet, so it's expected to be empty). Try playing a few games in the UI, and re-run the query!
{
  "data": {
    "games": []
    }
}
Using the Graph Protocol In Your App
Almost all of the heavy lifting is done - all that's left is to add the GraphQL query into our application and set it up to refresh.
The first thing we want to do is add the GraphQL API URL to our .env.local. Once that is done, go ahead and restart the server.
From here, to get a history of games, we just have to make the same GraphQL call as above.
On the start-here branch, you can take a look at components/RecentGames.tsx to get an idea of how we do this.
The GraphQL query gets defined as a string at the top of the file
We use Apollo to execute the GraphQL call (find the client defined in
graph.tswithout API URL), in combination withreact-queryto manage loading, success, and error statesTo automatically re-fetch data, we hook up wagmi's
useBlockNumbertouseQuery's query keys, so it re-executes any time the block number changesWe feed this data into a table component for display
To add it to the app, just import the RecentGames component in pages/index.tsx like below:
import RecentGames from "../src/components/RecentGames";

export default function Home() {
    // ... app logic
    return (
        <div>
            /** inputs **/
            <GameResult />
            <RecentGames />     /** add this line **/
        </div>
    )
}
Now, you should see the Recent Games table showing up in your app, and showing all the activity since the startBlock we specified.
Play a few more games and see if the subgraph reflects it!
Extending Our Subgraph
So we have a way to track and view game history. What about player stats?
This is also not something we'd want to store in our smart contract, but it's interesting and important to people! It's also where the Graph really comes out and shines.
Let's see how we can extend our existing subgraph configuration to see player stats.
Add an Entity
Let's introduce a Player entity. We will want to track their identifier, as well as their wins and losses.
Open up schema.graphql file, and paste the below:
type Game @entity(immutable: true) {
  id: Bytes!
  win: Bytes! # address
  loss: Bytes! # address
  blockNumber: BigInt!
  blockTimestamp: BigInt!
  transactionHash: Bytes!
}

## add this
type Player @entity(immutable: false) {
  id: Bytes! # player's eth address
  wins: Int!
  losses: Int!
}
After we change our schema, we have to run graph codegen again.
This will generate types and constructors for our new entity, which our handler file will need.
Write New Entity To Subgraph
After running graph codegen, we can work the new entity into our handler. With each game played, we want to track both associated players and increment their wins and losses.
Let's extend our handler to create a Player entity with each game, and maintain wins and losses:
export function handleGame(event: GameEvent): void {
  let game = new Game(event.transaction.hash.concatI32(event.logIndex.toI32()));
  game.win = event.params.win;
  game.loss = event.params.loss;

  game.blockNumber = event.block.number;
  game.blockTimestamp = event.block.timestamp;
  game.transactionHash = event.transaction.hash;
  game.save();

  // ADD THE BELOW
  const winnerId = event.params.win;
  let winner = Player.load(winnerId);
  if (winner == null) {
    winner = newPlayer(winnerId);
  }
  updatePlayer(winner, true);

  const loserId = event.params.loss;
  let loser = Player.load(loserId);
  if (loser == null) {
    loser = newPlayer(loserId);
  }
  updatePlayer(loser, false);
}

// creates a new player entity
const newPlayer = (id: Bytes): Player => {
  const player = new Player(id);
  player.wins = 0;
  player.losses = 0;
  return player;
};

// updates entity
const updatePlayer = (player: Player, win: boolean): void => {
  if (win) {
    player.wins = player.wins + 1;
  } else {
    player.losses = player.losses + 1;
  }
  player.save();
};
Deploy New Subgraph
The process will be the same and will create a new version of our GraphQL API.
To re-deploy, run the following:
graph build-> builds updated executable with our new handlerupdate
subgraph.ymland addPlayerunder entitiesgraph deploy <your project>with a new version number (incrementing by 1 on major changes is best practice)
The deploy function will give you a new API URL (noted by your version number in the deploy command). Visit the link, and execute the below GraphQL.
 query  {
    players (first:100, orderBy: wins, orderDirection: desc) {
      id
      wins
      losses
    }
  }
You should see an output like below.
{
    "data": {
        "players": [
            {
                "id": "0xf207a7340103fd098908bc74eb8174d745baa3a6",
                "wins": 3,
                "losses": 0
            },
            {
                "id": "0xb0136a89a159a85f3f7e76e77e2450538a70b0ab",
                "wins": 0,
                "losses": 3
            }
        ]
    }
}
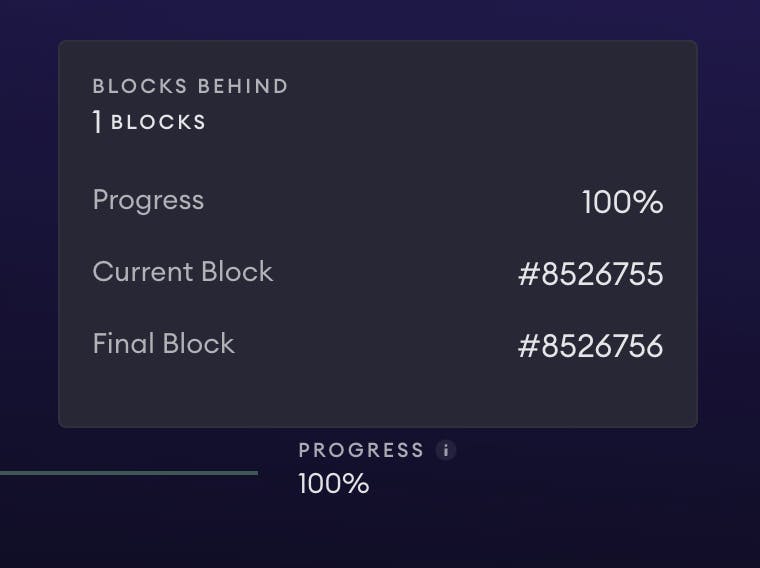
NOTE: it's advisable to check the status of on your deployment in Subgraph Studio, and make sure it's 100% indexed.
If the startBlock is too far in the past, the indexer will be too far behind and take a long time to sync back up. If you see your indexer being 100+ blocks behind, update subgraph.yaml with the latest block number, re-deploy, and seed some more data for yourself (play some games).
Add New Entity to App
To display data on our Player entity, it's very similar to before.
Update
.env.localwith your new API URL and restart NextJSTake a look at
components/LeaderBoard.tsx(same functionality asRecentGames, just with different data schema and GraphQL)Import the
Leaderboardcomponent, and add it underRecentGamesPlay some games against different addresses, and watch the player table update.
Conclusion
Congrats!
You now have a simple "pseudo" game, where gameplay and outcomes are completely decentralized. Using the Graph Protocol and some UI libraries, you were able to set up a way to view game history and track player stats in a decentralized manner, with fairly minimal code!
Where to Go From Here
There are tons of ways to extend this project and build something cooler!
Add proper UX around gameplay, such as requesting and approving games (right now, you can type in anyone's address and "play" against them
Introduce true verifiable randomness to the outcomes using ChainLink VRF
Introduce betting
You can start with pseudo values passed in as arguments into the smart contract, and extending your subgraph to log funds and total wins and losses of each player
Let people actually bet funds - requires logic to let players deposit money and approve a game request, as well as storing data on staked funds. Lots of complexity and security due diligence here!!
Speed it up by deploying to an L2!
Create a more complex decentralized game
I'm super excited to see what you create from this. Feel free to tweet me @mikleens and share what you build, or ask me any questions!!
Cheers & happy hacking,
Lena
